Advanced map
Ship Capture
Daily challenges


More Advanced maps



Info
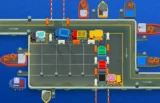
Ship Capture is an Advanced map added in update 57.0, the update that also introduced the S.P.I.D.E.R. Monkey, the Sniper Monkey paragon. It was designed by a fan in the Map Editor and was one of three winners of the 7th anniversary map competition, alongside Mushroom Grotto and Tricky Tracks. Your monkeys defend a large ship while two enemy pirate ships pull alongside and board it.
Layout and path. Each enemy ship lays down two planks, so there are four entrances in total. The two planks from each ship merge into one lane, and both lanes head into the inside of your ship, which is the exit. The two lanes end at almost the same point.
Which ship attacks. The invading ship changes every five rounds:
- Right ship: rounds 1-4, 10-14, 20-24, 30-34, 40-44, 55-59, 70-74, 85-89, and 100.
- Left ship: rounds 5-9, 15-19, 25-29, 35-39, 50-54, 65-69, 80-84 and 95-99.
- Both ships: rounds 45-49, 60-64, 75-79 and 90-94.
So round 40's first MOAB comes from the right, round 63 comes from both sides, and round 100's BAD comes from the right.
Placement. You can build on your ship's deck, on the large quarterdeck at the bottom, and in the crow's nest, which fits up to five small towers such as Snipers. The ocean around the ships is not placeable water.
The hatch. A hatch in the middle of the deck holds land towers. If nothing is standing on it, you can remove it for $1,000 to reveal water for water towers.
Line of sight: yes, parts of the ships block it. High ground: the crow's nest.
Despite four entrances and very short lanes, Ship Capture is an average Advanced map, because the lanes merge and end near the same point. It plays a lot like Dark Castle, with stalling towers being especially important.
How to beat Ship Capture
Map overview for strategy
Ship Capture looks chaotic, but every bloon ends up in the same place: the inside of your ship. The lanes are very short, so the best defences sit close to where they converge and slow bloons down as much as possible.
Things to plan around:
- Know the five-round cycle. For most of the early game only one side attacks at a time, so early towers can focus on that side. From round 45, both ships sometimes attack together.
- Build near the convergence point. Towers near the exit hit both lanes. Long-range towers such as Desperados can cover both lanes from one spot.
- Remove the hatch for water. At $1,000 the central water is a strong spot for water towers like Mermonkeys and Subs.
- Stall. With lanes this short, glue, stuns and knockback are worth more than on most maps.
- Use the crow's nest for up to five small towers, such as Snipers that need no line of sight to the track.
Best towers
- Spike Factory 2-0-5 or 0-2-5 (Perma-Spike): set its target manually to the spot between the two main lanes so it catches bloons whichever ship they came from.
- Mermonkey (Abyssal Warrior, then Lord of the Abyss): in the water revealed under the hatch, Abyssal Warrior is a strong cleanup tower and carries well past round 40. Lord of the Abyss improves cleanup further and helps you save towards another tier 5 with stronger single-target damage.
- Desperado: its long range lets it cover both lanes from a central position.
- Glue Gunner 0-2-4 or 0-2-5 (Relentless Glue, Super Glue): stalls both lanes near the exit.
- Sniper Monkey in the crow's nest: global range from high ground; a 4-0-2 Maim MOAB stuns blimps on either side.
- Monkey Village 2-2-0: on the deck near the exit to buff your central cluster.
Best heroes
- Sauda: near the convergence point she hits bloons from both lanes and benefits from stuns.
- Admiral Brickell or Pat Fusty: strong if you remove the hatch and build around the central water.
- Psi: global damage that ignores which ship is attacking.
Easy and Medium
Put your hero and a Dart Monkey near the exit, plus a cheap tower on the right side for rounds 1 to 4. Add a Boomerang or Tack near the convergence, a Village 0-2-0 by round 24, and a MOAB answer for round 40 on the right side. Remove the hatch when you have spare cash and add water towers.
Hard
Build a central cluster: Sauda, Tack Shooter 2-0-4, a Village 2-2-0 and Relentless Glue. Remove the hatch for a Mermonkey heading to Abyssal Warrior, then add Perma-Spike targeted between the lanes before the 80s.
CHIMPS
A practical CHIMPS route that respects the ship rotation:
- Round 1: Sauda near the exit where both lanes end, plus a Dart Monkey on the right side, since the right ship attacks first.
- Rounds 2 to 9: a Tack Shooter near the convergence point, upgraded towards 0-0-2. Round 5 switches to the left ship, so make sure Sauda and the Tack reach that lane too.
- Rounds 10 to 30: Tack to 2-0-3, Village 0-2-0 for camo by round 24. Save $1,000 and remove the hatch.
- Rounds 31 to 45: a Mermonkey in the central water, upgraded towards Abyssal Warrior. Tack to 2-0-4 Overdrive and Village to 2-2-0. Round 40's MOAB comes from the right ship.
- Rounds 45 to 63: both ships attack on rounds 45 to 49 and 60 to 64. Add a Glue Gunner towards 0-2-4 Relentless Glue and an Alchemist 3-0-1 on your main damage.
- Rounds 64 to 90: start Perma-Spike targeted between the lanes and upgrade the Mermonkey to Lord of the Abyss. Add a Maim MOAB Sniper in the crow's nest.
- Rounds 90 to 100: rounds 90 to 94 come from both ships, 95 to 99 from the left and 100 from the right. Save Sauda's abilities, Maim and glue stuns for the BAD.
Impoppable
Remove the hatch earlier and get Perma-Spike before round 75, because the "both ships" rounds hit hard with no room for error.
Dangerous rounds on this map
- Round 5: the first switch to the left ship; early towers placed only on the right side will miss it.
- Round 24: first camo.
- Round 40: first MOAB, from the right ship.
- Rounds 45 to 49: first time both ships attack at once.
- Round 63: ceramic rush from both ships.
- Rounds 90 to 100: DDTs from both ships, then the BAD from the right.
For full walkthroughs, the BTD6 Master YouTube channel has video guides for Ship Capture.
Frequently asked questions
When was Ship Capture added to BTD6?
Ship Capture was added in update 57.0, alongside the S.P.I.D.E.R. Monkey paragon.
Which side do bloons come from on Ship Capture?
The attacking ship switches every five rounds, starting with the right ship. From round 45, some blocks of rounds use both ships at once.
Can you place water towers on Ship Capture?
Yes, after removing the central hatch for $1,000. The ocean around the ships is not placeable.
How many towers fit in the crow's nest?
Up to five small towers, such as Sniper Monkeys.
What is the best hero for Ship Capture?
Sauda near the exit is a strong choice. Brickell or Pat Fusty work well if you build around the central water.
How do you beat Ship Capture CHIMPS?
Build a central cluster near the exit with Sauda, Overdrive and a Village, remove the hatch for an Abyssal Warrior Mermonkey, then add Relentless Glue, a Maim MOAB Sniper and a Perma-Spike targeted between the lanes.
Guides for every mode



Medium4/4




Hard5/5





Impoppable2/2

