Beginner map
In The Loop
Daily challenges


More Beginner maps







Info
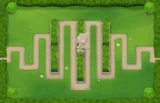
In The Loop is one of the original Beginner maps from BTD6's launch, and it is one of the maps always pinned at the front of the map menu. It is set in an autumn park, with orange leaves covering the ground and a rocky orange path.
As the name suggests, the track is built from loops. There are three medium-sized loops that curl inwards, joined by four straight sections. Bloons enter, run along a straight, go around a loop, and repeat until they reach the exit. The entrance and exit are close to each other, which means towers placed near the start can also defend the end of the track. There is one entrance and one exit, and the track is 44.39 RBS long (about 1,220 range units).
The top-right loop contains a small pond that counts as water. It is small, holding up to about four Monkey Buccaneers or five Monkey Subs, so it is better for a supporting water tower than a full naval strategy. There is a wheelbarrow near the top-right corner that blocks line of sight, but nothing else on the map gets in the way of your towers. There is no high ground and there are no removable objects.
The large open area in the middle of the map is one of In The Loop's best features. It is big enough for Banana Farms, a Monkey Village or a Sun Temple, and towers placed there can reach a large part of the track.
Compared with other Beginner maps, In The Loop is balanced. It is not as long as Logs or Cubism, but the loops give short-range towers lots of value and the straights suit high-pierce towers like the Spike-o-pult or Captain Churchill. It plays a lot like the BTD5 map The Rink, and it has been used in more Odysseys than any other map.
How to beat In The Loop
Map overview for strategy
In The Loop is easy because it offers something for every kind of tower. The loops are ideal for short-range towers that use their whole range circle, such as Tack Shooters, Ice Monkeys and Sauda. The straights before and after each loop suit towers with long-travelling, high-pierce attacks. The middle of the map is open and central.
One map-specific detail matters a lot: the entrance and exit are close together. Towers placed near the start also protect the end of the track, so leaks get a second chance. The flip side is that regrow bloons that escape your main defense have a long trip around the map to heal before they reach the exit, so deal with regrows early.
If you use Spike Factories, place the spike pile low on the track. Large blimps like ZOMGs and BADs have big hitboxes and can eat spikes meant for other bloons.
Best towers
- Tack Shooter 2-0-4 or 4-0-2 inside a loop.
- Dart Monkey 4-0-2 (Juggernaut): the spiked balls travel along the straights and pierce huge numbers of bloons.
- Ninja Monkey 4-0-1 and 2-0-4: camo detection and Sticky Bombs.
- Alchemist 4-2-0: buff the central damage.
- Monkey Sub 2-0-4 in the top-right pond, with Advanced Intel letting it shoot anything your other towers see.
- Boomerang Monkey 4-2-0: glaives bounce around the loops.
- Super Monkey: a Sun Avatar or Sun Temple in the middle area reaches most of the map.
- Monkey Village 2-2-0: radar and speed in the middle.
Best heroes
- Captain Churchill: his shells travel down the straights and he has great range from the middle area.
- Sauda: inside a loop near the start and exit she hits bloons twice.
- Quincy: cheap, simple and good on the straights.
- Obyn Greenfoot: good with a Ninja and Druid build.
Easy and Medium
Start with a Dart Monkey near the entrance and a Tack Shooter in the first loop. Add a Ninja for camo before round 24, a Bomb Shooter or Alchemist for leads, and Banana Farms in the middle. A Juggernaut, a 4-0-1 Ninja and a Glaive will win Medium.
Hard
Farm two or three Banana Farms. Build near the entrance and exit so the same towers cover both: Ninja 4-0-1, Alchemist 4-2-0, a Tack in the first loop and a 2-2-0 Village. Add a Sub in the pond and Sticky Bomb Ninjas for the MOAB rounds.
CHIMPS
- Rounds 1 to 6: Sauda or Quincy near the entrance and exit, plus a Dart Monkey on the first straight.
- Rounds 7 to 18: a Tack Shooter in the first loop (2-0-2), then a Ninja for camo before round 24.
- Rounds 19 to 30: an Alchemist touching the Ninja. It pops the round 28 leads.
- Rounds 31 to 45: Ninja to 4-0-1, Alchemist to 3-2-0, Tack to 2-0-4. A Sub in the pond at 2-0-3.
- Rounds 46 to 63: a 2-2-0 Village, Sub to 2-0-4, and a 2-0-4 Sticky Bomb Ninja by round 60. A 4-0-2 Juggernaut on a straight helps a lot on round 63.
- Rounds 64 to 80: Alchemist to 4-2-0, a second Sticky Bomb, and a Sun Avatar in the middle.
- Rounds 81 to 100: upgrade to a Sun Temple in the middle, where it covers most of the track. Add Sticky Bombs for 98 and 99, and keep camo coverage over the core for 95 and 99.
Impoppable
The middle area is perfect for farms early and a Sun Temple later. Follow the CHIMPS plan and add an extra layer of Sticky Bombs before round 95.
Other modes
- Deflation: a Juggernaut, a Ninja and an Alchemist near the entrance give strong value.
- Half Cash: Sauda in the first loop and a Dart Monkey are cheap and effective.
- Primary Only: Tack Shooters in the loops and Dart Monkeys on the straights.
- Apopalypse: towers covering both entrance and exit are especially valuable when there are no breaks.
Dangerous rounds on this map
- Round 24: one camo green and 20 blues. Have a Ninja or radar near the entrance.
- Round 28: six leads. Tack Shooters without Hot Shots and Dart Monkeys cannot pop them.
- Round 40: the first MOAB. Make sure your damage near the start can handle it, since the exit is close by.
- Round 63: 122 dense ceramics. Spread pierce across the first loop and the straights.
- Round 76: 60 regrow ceramics. Regrows that escape early have the whole track to heal.
- Round 78: camo ceramics and purples. Purples resist fire, energy and plasma.
- Round 95: camo regrow purples and fortified leads, then MOABs and DDTs.
- Round 98: 30 fortified BFBs and 8 ZOMGs. Sticky Bombs and Sun Temple damage are essential.
- Round 99: 60 MOABs and 9 fortified DDTs.
- Round 100: one BAD. It cannot be slowed, so stack single-target damage.
The BTD6 Master YouTube channel has video guides for In The Loop if you want to watch a full game.
Frequently asked questions
What is the best hero for In The Loop?
Captain Churchill and Sauda are both excellent here. Quincy is the reliable budget pick.
Does In The Loop have water?
Yes, a small pond inside the top-right loop that fits about four Buccaneers or five Subs.
Why should I build near the entrance on In The Loop?
The entrance and exit are close together, so towers there defend both the start and the end of the track.
How do you beat In The Loop CHIMPS?
Build a Tack, Ninja and Alchemist near the entrance, add a Sub in the pond and a Village, then Sticky Bombs and a Sun Temple in the middle of the map.
How much Monkey Money does In The Loop give?
First-time medals pay 75, 125, 200 and 300 Monkey Money for the Easy, Medium, Hard and Impoppable/CHIMPS tiers. Replays pay one fifth.
Guides for every mode



Medium4/4




Hard5/5





Impoppable2/2